Showing posts with label Tutorial. Show all posts

Friday, 6 July 2012

Tutorial: Embellished Tea Towels

To tie in with our kitchen theme this month we have a great tutorial for you. Really simple to make but a lovely present for someone or perfect for making tea towels to match your kitchen decor. We chose apples and polka dots to go with the rest of the items in our kitchen display.


Requirements:
Plain tea towels
Chosen fabric - 11" x width of tea towel plus 1/2"
Ribbon or tape for hanging 7"
Other ribbon or trim as required.

Instructions:
1.Take your tea towel and measure the width at the bottom hem as shown and add 1/2" to this measurement and this will be the width for your cutting.


2. Cut your fabric using the width measurement from step 1 and cutting the length to 11".

3. Fold the cut fabric in half matching the two long sides and with right sides facing and press. Then take 7" of hanging tape or ribbon and fold in half. Open up the fabric and pin the folded tape just below the pressed line as shown.

4. Fold the fabric back in half and then stitch using 1/4" seam allowance, along both the short edges.


5. Turn right sides out and press. Tuck the bottom end of the tea towel inside the fabric sleeve just made. 


6. Pin the tea towel right to the top of the fabric and stitch along to hold tea towel in place.


7. Turn under the bottom edge of the fabric by 1/2" and press. Then pin the bottom edge flat to the tea towel and stitch along that edge.


8. Add trim as required.

Happy sewing,

Kelly

Friday, 8 June 2012

Inspiration: Father's Day

On Sunday the 17th June it is Father's Day here in the UK and we have been trying to think of things that we can make for the Dads in our lives.

I have been scouring the internet for some inspiration and I thought that I would share some of it here with you. Check out our Father's Day Pinterest board to see all these ideas and more in one place.

Flickr:

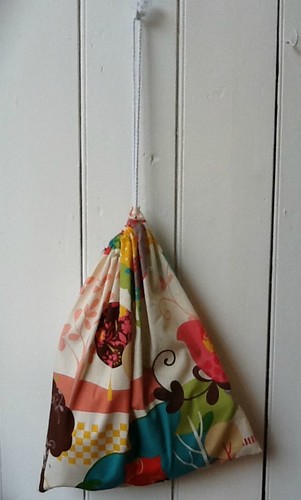
How about a simple drawstring bag? Great as a laundry bag or for putting shoes in when traveling:


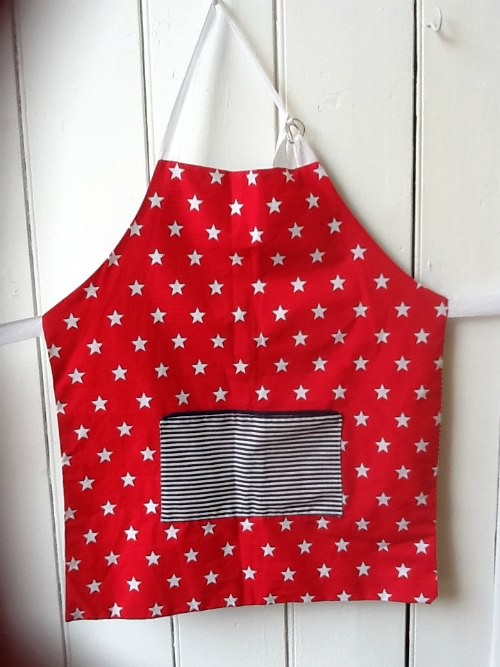
If your dad likes to cook then how about a brilliant reversible apron?


Both of these items can be made with us in store at our Open Sewing Sessions. If you don't have time before Father's Day then any of these items would be great birthday presents too.

Tutorials:

Make a one of a kind tie for your dad with this tutorial from The Purl Bee. I think that this is such a lovely idea and you can make it really personal to him.

image credit

Or is your dad more of a gadget man? Here are some great tutorials to make something snug for his favourite items.

I used this great quilted iPad cover tutorial to make the one below recently.

Image courtesy of A place of my own
Or perhaps he has a laptop and you think you could make him a laptop sleeve.

image credit
Finally maybe just something smaller to hold an iPod or camera or even special items such as cufflinks or a watch when traveling. This Gadget Cosy Tutorial is quick and simple and there are loads of things it could be used for.

image credit

Obviously if you decide to make any of these you will need fabrics that would suit your dad's personality. We have a great fat quarter bundle online and instore now called 'Hello Sailor' which would be great for men.


If that doesn't seem the thing for your dad then why not have a browse through our other fabrics for sale and see what you think he would like. Here are some of my picks.


Tuesday, 5 June 2012

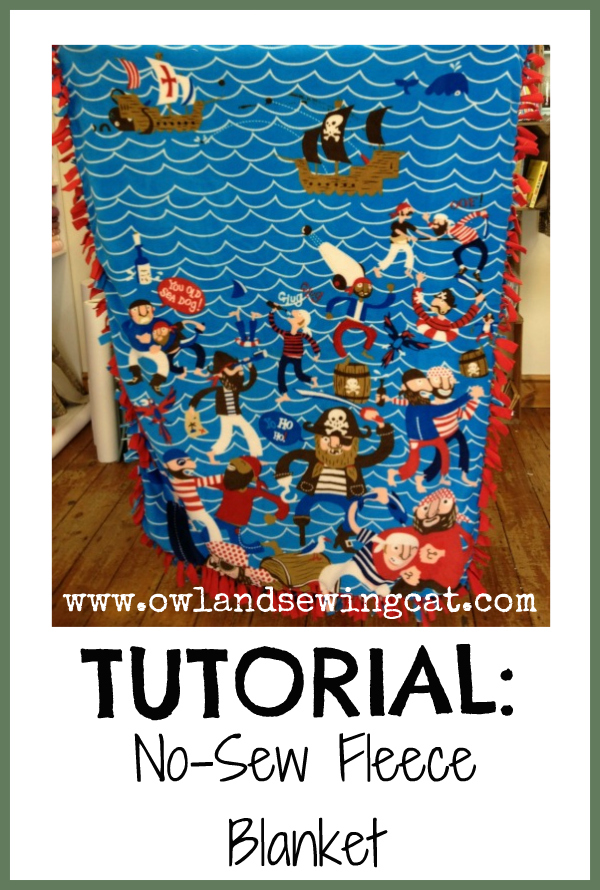
Tutorial: No-Sew Fleece Blanket

Today we have a quick and easy tutorial to share with you. So simple that you don't even need to be able to sew, just use a pair of scissors and tie knots. This would be a brilliant project for half term and once you are finished you will have a great fleece blanket perfect for keeping you warm. We love to use these for snuggling under to watch a family film, and if you are going camping these will protect you from the night time chills! You can either close up all four sides or leave the top open and climb inside to use it like a sleeping bag. Then you can just throw your pillow and pyjamas in and you have a portable bed wherever you are.


Requirements:
Two pieces of fleece, 1m or larger.
Scissors

Notes:
The pirate fleece fabric is sold by the panel and is 120cm x 160cm
We have a variety of different fleece fabrics for sale in our online store.

Instructions:

1. Lay the two pieces of fleece wrong sides together and go round the sides that you want to tie together, making cuts every inch that are 4 inches long. Your blanket will now have a tassle fringe. If you want to have the top edge open you can either leave it uncut or have it with tassles that you don't tie up.

2. Have a seat and placing the blanket on your lap work your way round tying the front and back together with a simple double overhand knot (or reef knot). Continue your way round the blanket until all edges are tied together.

3. Snuggle under your handiwork and enjoy!


Check out our other tutorials for some great items to make.

Happy Sewing,

Kelly

Friday, 11 May 2012

Tutorial: Bunting


It is almost the weekend and I am here today to share a really simple sewing project with you. Bunting is quick and easy to make, looks great it any room of the house and it is a brilliant beginners project for someone who wants to learn how to use a sewing machine. Lots of people make this in our Open Sewing Session and if you come in store we are happy to help cut your flags.


Requirements:
3 fat quarters
4.5m bias binding
Sewing machine
Tape measure
Scissors
Needle and thread
Pins

1. To start with you need a template for your flags. We use a triangle that is 7.5 inches deep from the bottom point to the top of the straight edge. The best thing to do is cut one out of cardboard that you can use again and again. We have made the bottom point of our triangles blunt so that we can tell which is the bottom of the triangle when cut.

2. Cut 24 triangles in total, which will make 12 flags. We used three fabrics for the front of our flags and the navy polka dot on all of the backs.

3. Place two matching triangles together with right sides facing. Turn the triangle so the blunt cut point is point facing downwards.


4. Then place five pins down the two side edges as shown on the photo above (I forgot to add one at the bottom point so mine just has 4!). The pins are important as the two sides are cut on the bias so will stretch without the use of pins. Stitch down the two side edges with 1cm seam allowance, leaving the top edge open, as shown in the photo below. If you wanted you could sandwich ric rac in between the two layers of fabric at this point for a different look.


5. Remove the pins and then cut across the bottom corner as shown, to remove excess fabric which will help your points turn out easier.

6. Turn the triangles so that the right side of the fabric is now on the outside and press all the edges with an iron. Use a pin to pull out the bottom corner and get as sharp a point as possible.


7. Trim off the excess fabric on the straight un-stitched edge as shown below.


8. Take the bias binding and fold in half width ways and centre under the needle on the sewing machine. Set your machine to zig zag (we use stitch length 4 and stitch width 4 but you will need to test it on your machine). With the bias binding folded in half zig zag stitch along approx 25cm this will form on of the ends of the bunting used for hanging up. Without removing the bias binding from the machine, slide the raw edge of one of the prepared triangles, into the folded bias binding. Pin in place and then continue stitching along in zig zag. Leave approximately 10cm between each flag. We use the distance from the needle to the front of our machine bed each time which saves us having to measure! 


9. Once all the flags are added carry on stitching for another 25cm so you have plenty at the end for hanging up.

Stand back and admire your bunting!


We have used the London fabrics we have had in store for this, but you could easily make this with any fabrics for any occasion. We have already sold out of the red crown fabric but we have a Limited Edition fat quarter bundle called 'London Too' available for order online or in store which would be perfect for making Jubilee Bunting.

We would love to see your completed bunting if you use this tutorial. You can email us or share a picture on Facebook

Happy Sewing,

Kelly

Wednesday, 25 April 2012

Tutorial: Crochet Basket Pattern


Materials

2 x 50gms Creative Cotton Aran

4mm crochet hook

Decorations of your own choice

Method

Begin with 6ch, join into a ring with a sl st.

Round 1:1ch, 6dc into ring, join with sl st.

Round 2: 1 ch, 2 dc into each st, join with sl st. (12 sts)

Round 3: 1 ch,* I dc in next st, 2dc in next st*, repeat, join with sl st (18sts)

Round 4: 1ch, *1dc in next 2 sts, 2dc in next st*, repeat, join with sl st (24sts)

Round 5: 1ch, *1dc in next 3 sts, 2dc in next st*, repeat, join with sl st (30sts)

Round 6: 1ch, *1dc in next 4 sts, 2dc in next st*, repeat, join with sl st (36sts)

Round 7: 1ch, *1dc in next 5 sts, 2dc in next st* repeat, join with sl st (42 sts)

Round 8: 1ch, *1dc in next 6 sts, 2dc in next st* repeat, join with sl st (48sts)

Round 9: 1ch, *1dc in next 7 sts, 2dc in next st*, repeat, join with sl st (54sts)

Round 10: 1ch, *1dc in next 8sts, 2dc in next st*, repeat, join with sl st (60 sts)

Round 11: 1ch, *1dc in next 9 sts, 2dc in next st*, repeat, join with sl st (66sts)

Round 12: 1ch, *1dc in next 10 sts, 2dc in next st*, repeat, join with sl st (72 sts)

Round 13: 1ch,*1dc in next 11sts, 2dc in next st*, repeat, join with sl st (78 sts)

Round 14: dc in back loop of each st, to mark edge of base.

Continue to dc all 78 sts for each row, joining with a sl st until desired height is reached, including turn back. Work an edging if desired. Fasten off and sew in ends.

Suggestions for decoration: Ric Rac, Bobble braid, embroidery etc.

Finished size of basket  is approx. 6” diameter, and 6” high with top rolled down. Size of basket can be altered by working more or less rounds for base and/or sides.

Abbreviations:
ch – chain
sl-st – slip stitch
dc – double crochet
st - stitch
sts - stitches

Friday, 13 April 2012

Tutorial: Simple Tote Bag


Requirements:
2 pieces of fabric 15” (38cm) x 19” (48cm) for main bag
2 pieces of fabric 3.5” (9cm) x 27” (68cm) for straps
Sewing machine
Tape measure
Scissors
Needle and thread
Pins


1. Take the two rectangle pieces of fabric and place them right sides together and stitch around the three sides taking a ¾” (1.5cm) seam allowance and leaving the top edges un-sewn. Zig zag the outside edges together or pinking shear, to neaten them and then turn rights side out and press.


2. Fold over and press 1 inch (2.5cm) from the top edge and then another 1 inch (2.5cm) to make a double hem along the top edges. Then pin in place.


3. Next step is to make the handles, by taking the long strips and fold them in half lengthways with the right sides together and press. Then stitch the long edges together with a 3/8 inch (1cm) seam allowance. Turn the straps the right side out by attaching a safety pin to one end on the single fabric and push it through until it comes out the other end and is then turned the right sides out. Now press the straps flat with the seam on the centre of the reverse and topstitch along both long sides of the straps for a neat finish and to stop them twisting.


4. Using pins mark the handle positions on the bag’s top hem, placing them 3” (7.5cm) in from the side seams. Then take the straps and pin them in place tucking them under the top hem of the bag. Once pinned in place double check that the straps are not twisted and machine stitch the hem around the top and bottom edges a foot width away from the edge, therefore reinforcing the handles at the same time.


5. For some more fun add ric rak, decorative trim, labels or buttons onto the anchor points of the bag.


We would love to see any bags that you make. Email us a picture or add to our Facebook page.

Tuesday, 9 August 2011

Tutorial: Envelope cushion from two fat quarters


Requirements 
Two co-ordinating fat quarters (a fat quarter is 50cm x 56cm) 
One 16” cushion pad/insert 
Pins 
Tape measure 
Thread 
Sewing machine (or hand sewing needle) 
Fabric scissors 
Pinking shears 
Trims as required ie. Pom poms, rik rac, buttons etc. 

1.Place the two fat quarters together with right sides of the fabric facing each other. Then stitch the two fat quarters together down one of the shorter edges and then press open. At this stage add any trims that you would like, on this example we have used pom poms along the centre seam. 

2.Decide which fabric you would like to have less of showing on the front and then cut a 3” strip of the end of this fabric as shown below. 
3.Fold the fabric in half lengthways and trim the width down so it measures 16.5” wide as shown. 
4.Take one of the shorter edges and turn up by 1cm and press all along the edge and then turn up again by another 1cm and press so that the raw edges are hidden, as shown below. Then stitch along this edge, to hold back where you have pressed. Repeat this with the other short edge. 
5.With right sides facing up, mark with a pin on the bottom edge, 5.5” along from the seam (where the two fabrics are joined) on the fabric that you want the least of, as shown below. Then repeat on the top edge. 
6.Measure 16” along the bottom edge from the pin and mark this point with another pin and this will mark out the front of your cushion, and then repeat on the top edge. 
7.Take the shorter side and fold over from the pins as shown. 
8.Take the other side and over lap from the pins across as shown. This forms the overlap of the envelope cushion. 

9.Pin the top and bottom edge and stitch along where pinned 1cm from the edge ensuring that you stitch right to the corners.

10.Trim the two side raw edges with pinking shears to avoid fraying. 
11.Turn the cushion so that all the right sides of the fabric are on the outside and then give a final press with the iron. Insert the cushion insert/pad through the opening and your lovely cushion is finished.

Monday, 8 August 2011

Tutorial: Pencil case


Rebecca has written us a great tutorial on how to make a fab back to school pencil case. Click on the link to see full instructions and photographs.

Happy Sewing!

Sunday, 16 January 2011

Tutorial: Quick and easy envelope cushion


Requirements:
Fabric 40”x 16.5”
16” cushion pad
Sewing machine
Tape measure
Scissors
Pins


1. Cut a length of fabric 40” wide by 16.5” long, and lay with right side down, so the wrong side is therefore facing you. Then mark with pins 12" in from each end along the width, on the top and bottom edge, as shown below:
2. On both ends (the shorter sides) turn and press the edge under by approx ½”. Then turn under again approx ½” and press. Then stitch in a straight line along the edge as shown below, and repeat this process on both short ends.
3. Fold over both sides of the fabric, right sides together, to the pin points earlier put in place and pin along the top and bottom edge. This will mean that there is an overlap in the centre, and the fabric now forms a square shape. Then machine stitch a straight line along the top and bottom edge using a 1/4” seam allowance as shown below:
4. Then turn inside out, so that the right side fabric is on the outside and press the seams. Then put the cushion pad in through the overlap, and your cushion is complete. If you wish decorative bows, buttons or ties can be added across the overlap. 


HAPPY SEWING
Related Posts Plugin for WordPress, Blogger...